
Chainsaw Milling 101
I have been milling logs for a few years now. When I first decided to try it, I watched a ton of videos to learn how to do it and to figure out what gear I needed. I thought that this article and accompanying video might help people who are thinking about jumping into the chainsaw milling game. If you are considering it, do it because it’s a lot of fun!
What is Alaskan chainsaw milling?
It’s the act of cutting trees into slabs or boards so they can be used for building things. One of the most enjoyable aspects for me is the saving of the tree. I do urban logging, meaning that I’m milling trees that are cut in someone’s yard. Every day trees are cut down and then turned into firewood or mulch. This gives me the opportunity to save that tree and turn it into something beautiful.
Equipment that you need
Chainsaw:
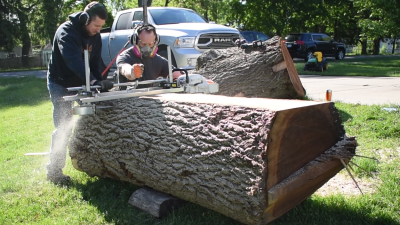
The most critical tool is obviously a chainsaw. In the world of chainsaw milling, the more powerful the saw the better. You can mill with a smaller saw; however, it’s going to be really slow. On average, it takes me about 10-15 minutes to make one cut using my saw, based on the size logs that I typically cut. Expect that a smaller saw will cut slower. I use a Stihl 661 professional grade saw and love it. It’s an absolute workhorse.
Chainsaw bar and chain:
The bar is the part of the saw that sticks out and holds the chain. Each saw has a recommended maximum bar length so check your saw’s manufacturer for their guidelines. I’ve seen people exceed these recommendations so they aren’t a hard and fast rule. The length is often based on the amount of bar oil your saw can support. The saw lubricates the chain and bar so that they doesn’t overheat. The longer the bar, the more lubrication it will need. If your saw can’t support oiling, then you risk overheating. To get around it, some millers will add an extra oil pump to their setup.
I use a 36 inch bar on my saw. If you are just starting out in milling, know that the size of the bar will not be the size of the log that you can mill. Some space will be taken up by the mill itself. More on that later. While milling, I refill the gas and the bar oil after each cut. It’s common for me to go through almost as much oil as gas; I adjusted my saw so that it spits out as much oil as allowed because milling is really taxing on a saw.
As far as chain goes, I use a ripping chain for milling. Ripping chain has teeth cut at a certain angle, allowing it to cut faster horizontally with the grain. It tends to give a smoother cut too. You can use a regular chain if you want, but ripping chain will save you a lot of time.
Saw mill:
You don’t want to free hand it when making slabs; you’ll want to use a saw mill. There are a ton of brands/options out there. Doing a quick search for “Alaskan saw mill” will show you a several choices. It’s really more important to consider the features of the mill. You want a mill that fits the length of your bar. Most mills are adjustable along the length of the bar. For example, I use a Granberg International MKIV chainsaw mill. I can make the cutting length shorter if I use a smaller bar, or I can make it as long as 32”. The mill will clamp directly onto the bar, but you have to leave room at the tip of the bar so the sprocket can spin freely.
You will also want a mill that is easily adjustable in height. Do you want to cut your slabs 2 inches thick? If so, how long does it take to adjust the mill to 2 inches? I generally cut slabs at 2.5”, occasionally cutting some thinner or thicker if I need a specific thickness for a project.
Guide rails:
The first cut requires guide rails attached to your log. I’ll discuss that more in a minute. Guide rails provide a flat surface for your mill to slide across when making your first cut. These can be manufactured or you can make your own. A section of an extension ladder is commonly used as guide rails. In my case, I used some 2x4s that I jointed and planed to ensure that they were flat.
Safety gear:
Safety gear is critical because there is an increased chance of injury when chainsaw milling, and I don’t just mean cutting your leg off. Running a saw at full throttle for 15 minutes produces a lot of dust, wood chips, and fumes. It is very easy to feel nauseated if not wearing a mask. I like to use a respirator, but I recommend using the mask that you will most likely continue to wear. If you hate wearing it, then you’ll make excuses not to wear it. Along those same lines, wear hearing protection and either safety glasses or a face shield. Your ears and eyes will thank you.
I also wear chainsaw chaps and gloves. These are designed to help stop the chain by unraveling when they are cut, binding the chain and forcing it to stop. Plus, they make the milling process more comfortable. I’m often on my knees when milling and it’s nice having that extra padding.
Extras:
There are some extra things that are going to be really helpful when you mill. Have a chainsaw wrench with you. You’ll need it to tighten or replace your chain. You’ll also need wedges. These don’t have to be expensive or fancy. I have some manufactured ones, but I’ve also used some made from 2x4s. You may want to bring a hand file with you so you can hand sharpen your chain. I also recommend a log peavey or cant hook. They will allow you roll the log over to find the best way to cut it.
How to mill
The first cut

Maneuver the log into the position that you want. I like to look the log over and determine how I can get the coolest looking grain. I also see what side seems to have the flattest surface. If there are any branches or lumps sticking up, I may buzz those off with the saw before attaching my guide rails.
I set the guide rails on the log, using a level across multiple areas to ensure that the ladder isn’t twisted. The flatter the first cut, the better results you’ll get from the rest of your cuts. I then screw my rails into the log using lag bolts. I bring different length bolts with me just in case they’re needed. I screw in a few bolts in various areas of the ladder and ensure that it is still flat and doesn’t move.
The first cut has to ride across the guide rails. Set your mill so that the saw will cut under the bolts. You definitely do not want to hit those when cutting. This first cut usually goes quickly since you aren’t removing much wood.
The rest of the cuts
Remove the rails and top slab so you can start slabbing up your log. Set your mill to the thickness that you want. Again, I like to cut my slabs at 2.5 inches. This is obvious, but remember that the thicker you cut them the heavier they will be. Make sure you have a way to move them.
All subsequent cuts do not require the rails. The mill will slide across the surface of the log. As you cut the log, slab by slab, you will eventually end up at the pith. The pith is the center of the log and easily seen when looking at the butt of the log. During the drying process, the pit will likely split. I try to make a cut that slices through the center of the pith so that I don’t have a slab that contains the entire pith. This reduces the chances of a giant split down the middle of that slab.
When you get down to the last remaining section of the log, it may be difficult to cut more slabs without the saw dragging on the ground. A good solution is to prop one end of the log up on something. This will give you some extra space, but it will also position the log at a downward angle. Gravity will serve as your friend and make cutting a whole lot easier. I will do this when milling smaller, lighter logs.
Drying out your slabs

Unfortunately, you can’t use your slabs right away. The wood will be way too wet. You will have to let them dry and acclimate to your climate. The old tale is to allow one year per inch of thickness. I find this to be extreme. I dry my logs in my basement, with a box fan and dehumidifier. It will take me about a year or so for two inch thick slabs to dry. You will know that they are dry by comparing the moisture to other wood you have in the same area. Using a moisture meter, measure the moisture content to wood in your shop that you know is dry (either something that’s been in the space for a really long time or wood that was kiln dried). Compare that to your slabs. The slabs need to be about the same content reading before you can work with them. For example, slabs that dry outdoors in Michigan usually do not drop below 15% moisture. Logs in my shop will drop to between 8-9%.
To help your slabs dry evenly, you will want to seal the ends. You can buy log sealer that is waxy. You brush it on the ends of the slabs and it stops moisture from exiting out the ends too quickly, which causes cracks. If you don’t want to spend the money, you can also use latex paint. I find that it works well.

Stack your slabs on a flat surface, elevated off the ground. If you stack them on distorted surface, they can dry warped. In between each slab, I use 3/4 or 1 inch thick stickers (wood sticks). Stickers allow air flow across all surfaces of the slabs. The thinner your stickers, the slower the drying process. I know that in my shop, if I use stickers thinner than 3/4 inch I risk mold growing on the slabs.
I hope that this article helps to demystify the chainsaw milling process. I love to mill logs. It’s a lot of hard work that I find well work the effort.
*As an Amazon Associate I earn from qualifying purchases.